Sie sind nicht angemeldet.

Lieber Besucher, herzlich willkommen bei: Das Wettringer Modellbauforum. Falls dies Ihr erster Besuch auf dieser Seite ist, lesen Sie sich bitte die Hilfe durch. Dort wird Ihnen die Bedienung dieser Seite näher erläutert. Darüber hinaus sollten Sie sich registrieren, um alle Funktionen dieser Seite nutzen zu können. Benutzen Sie das Registrierungsformular, um sich zu registrieren oder informieren Sie sich ausführlich über den Registrierungsvorgang. Falls Sie sich bereits zu einem früheren Zeitpunkt registriert haben, können Sie sich hier anmelden.

1

Freitag, 19. Dezember 2008, 20:40

1/32 BK-117 B2 "Westpac Rescue" Detailed build

Hello Gents

Well, I love this forum very much as there are many builds close to my heart here.......Rescue/civil helicopters!

I am sorry that I dont understand much here as I only know english. However some of you already have already been a wonderful help (troshi, Cakemixer & Georg) to me.

I am superdetailing the Revell 1/32 "Medicopter" to represent our local machine.

There is a bit of work to bring this up to a more accurate representation.

I wont go into all of the details again as to what I have done so far as it will take me forever. However here is a detailed look as to what I have done so far on this site (ARC)

https://www.arcforums.com/forums/air/ind…howtopic=156384

I am very happy to help or answer any more questions you may have.

I will post my updates here also now.

Cheers
Anthony

2

Freitag, 19. Dezember 2008, 20:43

Hi Guys here is my last update I did, thought I would also put it here to dee how it goes with photos etc...

On the port rear interior panel was moulded with equipment on it. This BK dosent have this particular style medical fit-out. I have now blended in all of the panels, and carefully restored the panel lines. The last panel has now been glued in place in prep for making a new floor and more panelling. I am really pleased at how it has come up, even though it has been a lot of work.


Next up came a spotlight that is situated in the belly of this machine under the pilots seat.


I marked out the centre after measuring up the postion on the real machine and a large hole was drilled out. A piece of 5.5mm plastic rod was taken and a 3mm hole drilled through the centre and carefully reamed out a fraction more to the right lens dia. A piece of larger tube was truncated and a triangular section was layed over one end and glued. This assy was then slid through at about a 40deg angle carefully trimming to get a precise fit and use as little filler as possible. The purpose of the larger piece on the end ensured that I was able to replicate the scalloped interior leading up to the front face as the light is set into the fuse. I have brushed some Mr Surfacer 500 around the edges to blend it all in (still needs buffing back) then trimmed the top where it protruded into the fuselage so the floor will fit later. This was a lot harder than it looks to get spot on and really took me ages.


Next up that I saw that needed attention was the skid openings. They are way too small. The actual dimensions in 32nd scale is 4mm(horizontal)X5.5mm(vertical) with the lower line slightly curved. The skid dia is 3mm (95mm actual). I needed plates on the front and rear faces so the openings had to be just wide enough to slide a 10thou shim down each side. These protruding 'triangles'were then sanded up to round the corners off. I still have to put a hex bolt head on the corner of each one.


I think that these little details will make all the difference on the end result. I have made a stand to sit her on during construction as well. I am working on the other upper windscreen frame at the moment and then I might look at the gutter tracks on the upper door track fairing. I think I am going to make new vertical stabs too.......


Thanks for looking and the encouragement you guys give me, it really spurs me on.

Cheers
Anthony

3

Freitag, 19. Dezember 2008, 21:38

Hallo Anthony,

I find your project BK 117 B2 really great!!!
I have seen your building already in the ARCforum and I’m very happy, that someone is building this BK 117 so detailed. :ok:
When I start my BK 117 C1 (Polizei NRW-Deutschland), I will try to build many things, like you have done ;) ;)
I think it will begin soon as possible.


Best regards

Patrick :wink: :wink:


PS. My English is not the best :roll:

4

Freitag, 19. Dezember 2008, 22:27

Hello Patrick

Your English is actually very good. Thank you for your compliments, I appreciate it very much my friend, especially seeing the lovely work you do.

I am looking at casting a few extra parts for anyone who may be interested in them for their BK 117 projects, like rotor blades and the rear panel with the equipment removed etc.

I look forward to your one also, and please let me know if I can help with any advice, measurements or photos etc.

Kindest regards
Anthony

5

Samstag, 20. Dezember 2008, 14:14

Hello Anthony,

Very good Project. The Details in this moment are so good practiced! :respekt:

I hope you will actualize soon!

Regards

Frederik

6

Samstag, 20. Dezember 2008, 14:36

Hello Anthony,

your project is very cool and your work is really good !! I have also seen your project at the other forum, and I'm very enthusiastic about it !!

:respekt: :respekt: :respekt:

I'm looking forward to hearing from you :)

Sarah

Dieser Beitrag wurde bereits 1 mal editiert, zuletzt von »EC135 T2i« (20. Dezember 2008, 14:43)


7

Samstag, 20. Dezember 2008, 21:56

Hi there

Thank you guys so very much!! :rot:

That means a lot coming from you both as I have admired both of your workmanship here on this forum.

I finished off theupper framework on the port side last night for the windscreen and will post some photos tonight when I have more time.

Thanks again and see you later on with some more photos

Cheers :wink:
Anthony

8

Sonntag, 21. Dezember 2008, 06:36

Hello again

I am trying to decide when I rescribe her wether to use my "Rosie the Riveter" or try these Archer rivet decals, any thoughts. I have never seen the decals before, are they any good?

Quickly snapped a couple of pics of the upper windscreen framework finished, quite happy with it as it turned out to be quite a tricky job.


Cheers for now
Anthony

9

Sonntag, 21. Dezember 2008, 13:52

Hello Athony,

it's perfekt!!!

Do you have a construction plan by the BK 117 or many pictures by the Cabine?
I'm searching data or dimensions by the Radarnose, because I want reconstruct the Radarnose in 1:32. I need the Nose for my Bk 117 build projekt (see Picture)


You have broadened your BK breadthwise. How much mm?
How you want build the new windscreen? to draw (tiefziehen)?
The framework of the windscreen looks perfekt. I hope, I can it too.
I love your projekt, because the BK 117 is my favorite Helicopter.

I hope, you can help me!

best regards to New Zealand :hand: :hand:

Patrick :wink: :wink: :wink:

10

Sonntag, 21. Dezember 2008, 23:45

Hi Patrick

That is a nice looking chopper that you want to do.

I widened the fuselage by 3.75mm. Sorry I am not sure what you mean by a construction plan of the BK 117. I have lots of photo's and taken many measurements. I have some templates of some shapes I can send you if you like.

I am going to get the windscreen etc vac formed. My friend is Tore Martin (Falcon and Squadron canopies) and he has offered to do new glazing if I supply the master. I will get a few extra ones made for you too if you like. But they will only fit if you correct the fuselage problem.

If you check Chris's (Cakemixer) BK 117 cockpit on this forum, you will see on page 2 he is making a nose like you need. I am sure he will be able to help you. I am sending him some parts when they are ready too as he is going tomake his wider as well.

Pleased to be able to help where I can :ok:

Keep in touch

Kind regards
Anthony

Wettringer

Administrator

Beiträge: 5 536

Realname: Stefan van Kisfeld

Wohnort: 48493 Wettringen

  • Nachricht senden

11

Montag, 22. Dezember 2008, 00:21

Hello Anthony,

please resize your pictures to max. 640x480!

Greets Stefan
Denken ist die schwerste Arbeit, die es gibt, deshalb beschäftigen sich auch nur wenige damit.

(HENRY FORD)

12

Montag, 22. Dezember 2008, 18:16

Hello Athony :wink: :wink: ,

I'm very happy, thanks for the Information about the width of the BK 117.
Can you me send your material (measurements,some templates of some shapes) by eMail? These can help me at my build-project.

I'm interested for the extra particles.

I will contact Chris,because of the radar nose. I think, he can help me.

thank you so much :hand:


Best regards :prost:

Patrick :wink: :wink:

P.S I send you my eMail-adress about a personal-message in Forum

13

Sonntag, 4. Januar 2009, 09:45

Well I had a good amount of time working on the BK this past few days and got a lot done.....for me anyway.

I hope my photo sizes are ok as I am not very good at this sort of thing

First up was the upper door track .
My kits moulded on fairing had quite an uneven line where it met the fuse. First up I scribed a line 4.5mm up from the lower edge of the fairing and scribed the panel line with an upward kink near the front(5.5mm back from the upper eyebrow window). Then another line 1mm lower was scribed. This second line runs across the top edge of the fairing and will serve to evenup/sharpen the point where the fairing meets the fuse. Then I flodded this line with Mr Surfacer and began the ardious task of blending it all together to accurately represent how the track should look. This took me ages and was a little more tricky thanI thought to get looking right.

Next up was the heavy gauge alloy plates rivetted to the side where the winch brackets attach. These are percular the the NZ machines and had been measured up prior to being made. I used 10 thou card and then it was sanded/buffed down to a more appropiate thickness that looked "right" and Mr Surfacer brushed around the edges to slightly blend it all together and buffed back


Then the clips for the mounting of the oxygen bottle was next up. My measurements were scaled back and this area was made. This part is to be sprayed red when the airframe gets painted also.


Then the part that slightly daunted me was all the many many drains/vent tubes dotted all over the lower fuselage. I measured up all their positions and used my Waldron punch and die set and using the 1,2 & 3 sizes I punched all the appropiate diameters and MEK'd them to the fuse in their respective locations. They still need their centres drilled out and various diameter hypodermic tubing inserted.

Finally I started rescribing the fuse(you probably cant see that with my crappy photography), I now have all the major panels scribed ready for the hatches etc to be next.

As you can see, the rear strakes behind each of the skid openings have been made along with the little circular plates on the front surfaces.

I dont think I have missed anything, so I will let the photo's speak for themselves.


She is starting to take shape now and these details are starting to make her look a little more interesting/busy.

I have a little more tidying to do on the port forward door track fairing to do.....and I must do that other nose NACA intake sometime!

Thanks for looking, and there are a few more (larger) pics on ARC

Cheers
Anthony

14

Donnerstag, 15. Januar 2009, 07:21

Well, as I mentioned earlier I went down to take a few shots/measurements off the BK and noticed that the upper door track was more complex than it looks in photo's.


My scribed lines on the top of the track just didnt look right, so I scraped a horizontal track for a strip of .010 x .020" plastic card to neatly sit in it., then I basically went right around the track with a curved end piece. After that I placed a strip along the lower face of the rear track (there is a ridge running along there) after that another piece of .010 x .020" strip was glued along the bottom edge of the front half with a final angled piece up by the door.

Hopefully this pic illustrates it better than I can explain.


This now gave me positive lines to blend in with filler to portray the subtle curves. The wider strip on the rear front face had the top bevelled in and Mr Surfacer 1200 was then brushed around it all to smooth it off. This actually took several applications until I was satisfied it was perfectly even and looked just like the real thing.

Next up is the gutter running along the lower edge. This really had me puzzled as I really didnt know how to accurately portray this. Finally after much gazing at photos I found some .020 / 0.50 round rod (Plastruct). I taped a length on my cutting mat and passed over it a few times to put a small flat on one side. This was then bent to shape and glued as I went. These pics should illustrate how I did that part.


Once this was carefully glued on (flat side to fuse) I rubbed it back with fine emery paper and contoured it to the right profile. I also thinned the card edges of the track to give an accurate scale thickness to the panel.

And this is one side finished. I am just working at finishing the stbd side at the moment.


This really took me a LOT longer than I thought it would, but I am really happy at how it looks now and am glad I did it.

Thanks for looking guys

Cheers
Anthony

15

Donnerstag, 15. Januar 2009, 23:38

hi anthony

and again: astonishing how much work you spend to get all the details and nearly completely renew the model.
wow

16

Freitag, 30. Januar 2009, 08:38

Hello gents

I have been busy making another sliding door to match the other side as well as tidying up many small details around the fuselage.

Well, I have just spent the last hour or so making the upper sliding door track at the forward end. I wasnt sure how to go about it, but when you break it down it isnt too bad after mindlessley staring at photos for ages.

There is a fine channel the door runs along, the channel I had was too chunky even though it was quite small, so I used an "L" section and scraped/sanded it back even smaller with thinned edges, then got a piece of 10thou card and glued it on the back, effectively giving it an h section. This works well as there is a panel in behind the channel (ha), this will all be sprayed satin black eventually.

This is the first one....looks ok to me and am happy how it turned out.

Off to start the other side now before I forget how I did it....


Thanks for looking

Cheers
Anthony

17

Freitag, 21. August 2009, 11:59

Hallo liebe Leute,
da Anthony down under wohnt, diese Sprache nicht spricht und hier trotz Fortschritt nichts mehr gepostet hat, dachte ich mir bin ich so frei hier mal den Link zu seinem Bauprojekt reinzustellen.
Denn es ist unglaublich toll was er da an seiner BK bastelt. Wahnsinns Detail

https://www.arcforums.com/forums/air/ind…c=156384&st=220

Ich denke das ihn das nicht stören würde. Schaut und genießt :-)

18

Freitag, 21. August 2009, 23:34

Hello again my friends

I have been away for a while as I have not been able to post and did not know why. I have just spent 1 hour on the internet and with Google Translator trying to figure out why. :nixweis:

Seems like I just had to re-register.....I think?

Anyway I am back. I have been here most days anyway watching all of your lovely work here. :party:

I will update my progress again soon.

Kind regards....your fellow Kiwi chopper builder!

Anthony

19

Freitag, 21. August 2009, 23:55

Hello Anthony,

I´m one of the silent readers of your building report, honestly I don´t know what to write! Your work is perfect!

Don't worry that there are no comments. I'm following it.

With kind regards,

Patrick :wink: :wink: :wink:

20

Samstag, 22. August 2009, 00:06

Thank you Patrick, you are too kind.

I have also gained much enjoyment from your lovely BK build my friend!

Feel free to ask questions etc and I will do all I can to help you.

Cheers
Anthony

21

Dienstag, 25. August 2009, 13:00

Wish I could show more work for the time spent this past week or so.

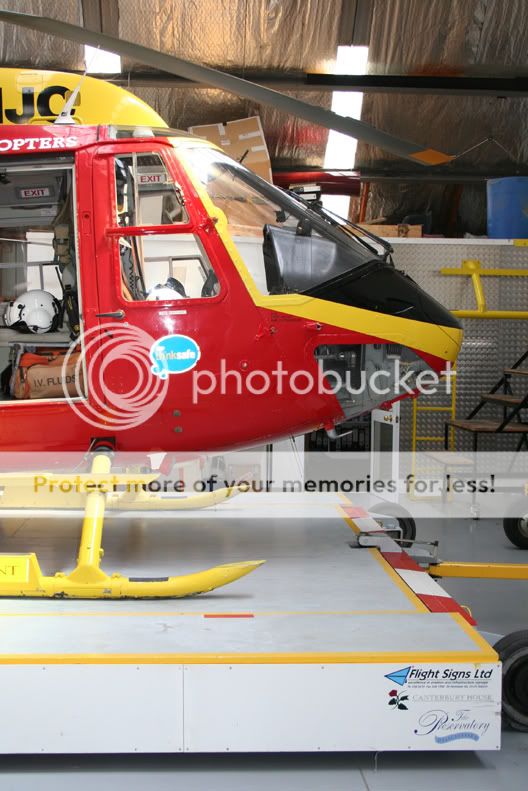
Anyway, I came across a problem of the instrument panel covers front contours not matching the windscreen line. No matter how I moved it around I just could not get it to fit properly! Time for a trip to see the machine herself and see where I went wrong or what I was missing.

As soon as I saw it I realised 2 things:

1. There was a recess through the centreline of the cover that the centre windscreen frame passed through
2. There was a panel between the windscreen and the cover(just below the frame line......phew!

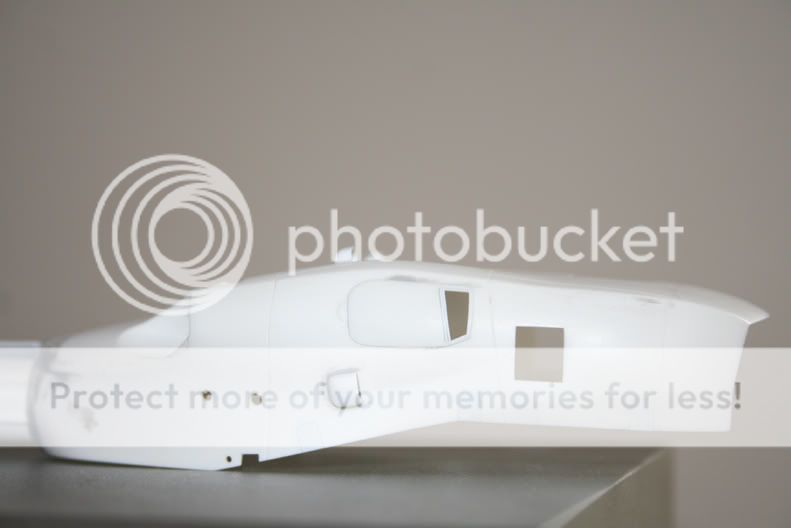
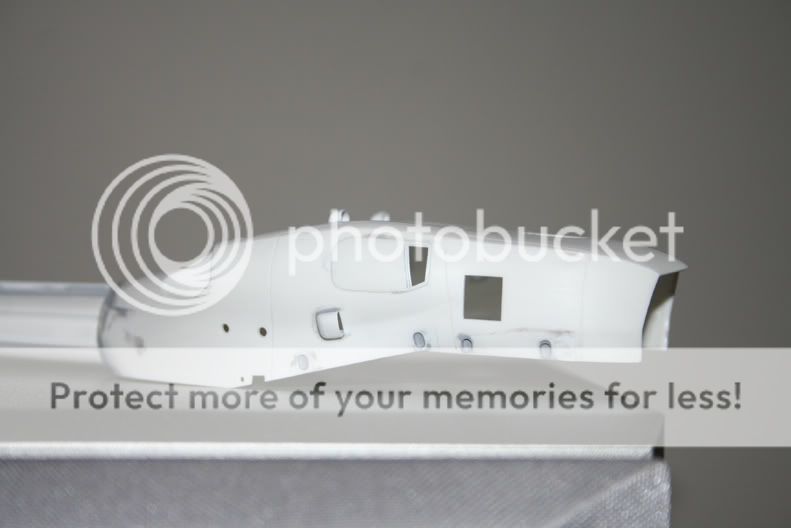
This entailed me fitting a 10 thou piece of card around the top edge as I have cut the lower windscreen line down to the frame line to compensate for the new windscreen fittment and replacement frame.


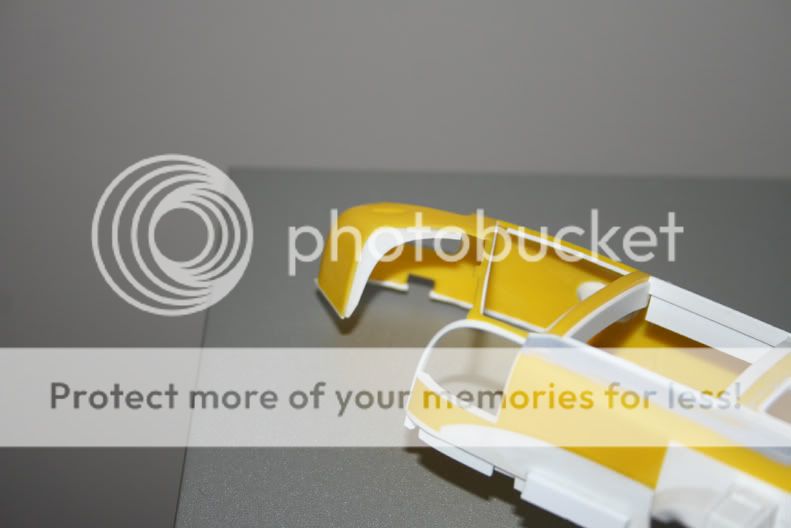
Now the front edge of the panel cover is too big and needed cutting right back and a constant trimming was needed for a nice fit. This took a fair bit of time as I had to make sure it was at the right height.

I wasnt going to glue this in but after many nights of fitting & trimming I decided that I really needed to if I was going to have a nice fit. It is going to slightly complicate things for me down the track, but I dont think I had any choice for the best result.

I jigged everything up and glued it in finally!

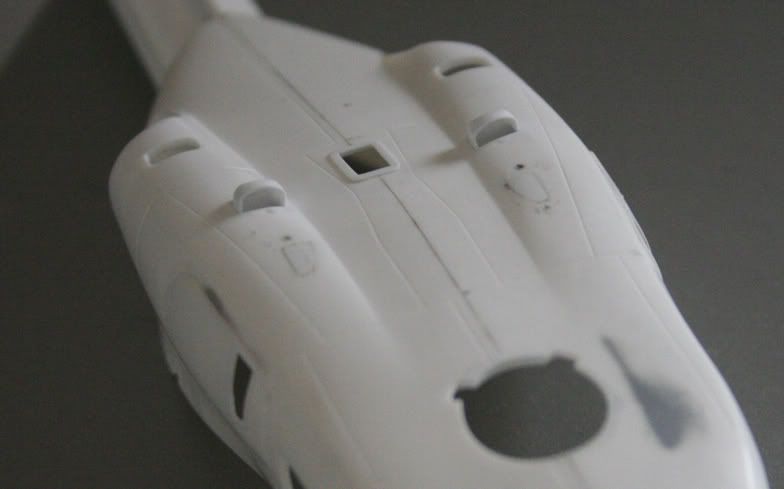
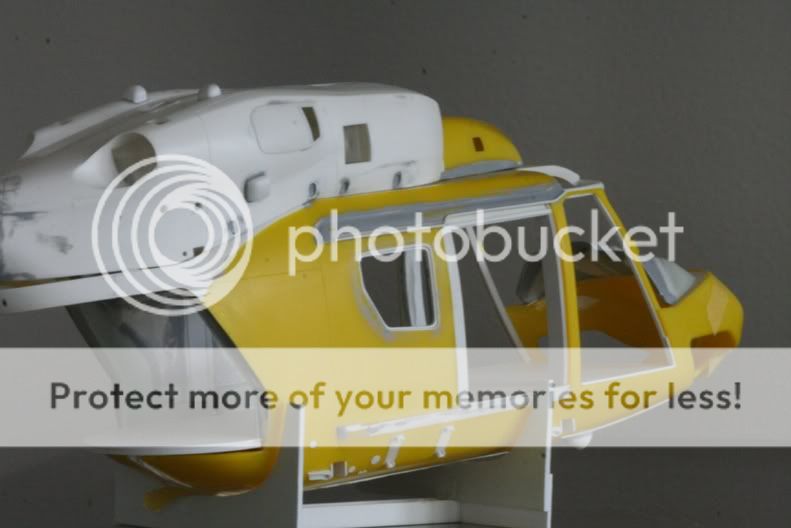
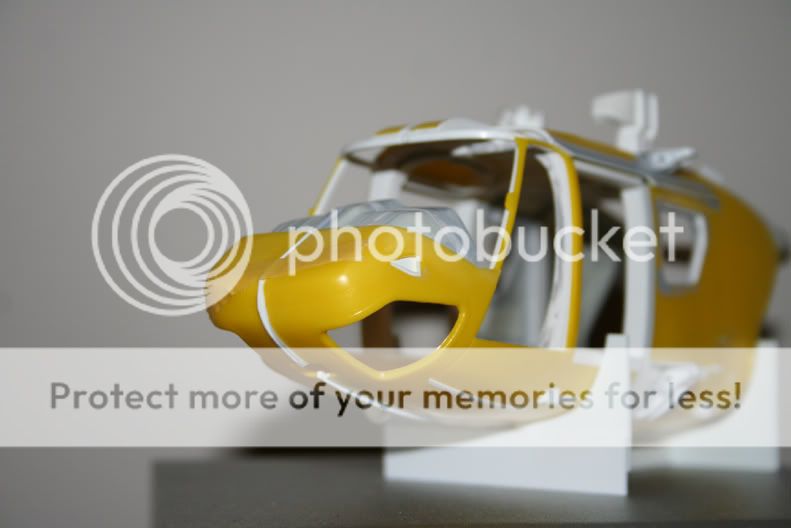
Then Mr Surfacer was brushed around the edge, I am really happy with how it turned out.


you can see in this photo the centre ridge has also been added.

I had to remove the temporary windscreen centre frame as this was only added earlier to line things up.

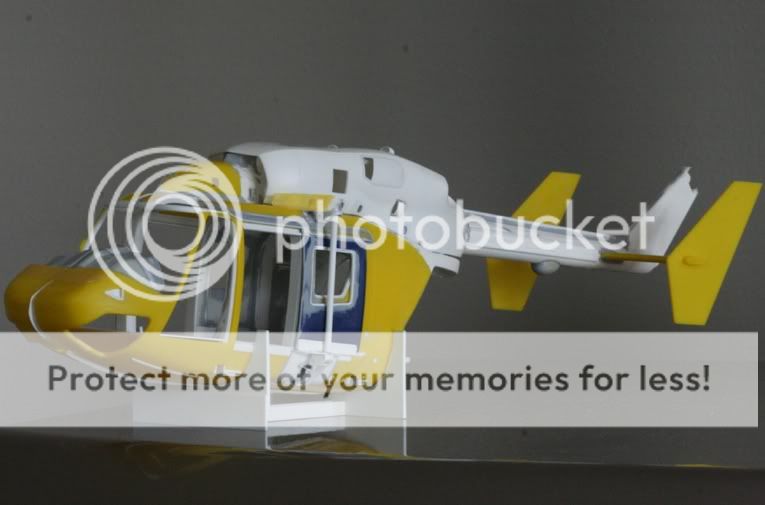
Here are a few quick pics before I go to bed

What do you think.....did I get it right?????? I hope so, I have spent so long on it I cant tell anymore! There may be a little tweaking here and there, but on the whole I think it is pretty close.


Excuse the photos...its getting late......again

Cheers and thanks for taking the time to look in.
Anthony

22

Dienstag, 25. August 2009, 14:56

Hello Anthony !

Gerat work, and all the details ...... WOW

Look very, very nice


Thorsten

23

Montag, 31. August 2009, 00:00

Thank you very much!

Well this week I decided I needed a change of pace so decided to do the intake scoops on the engine cowl.


So I tried my hand at vac-forming...........it took a little practice, but here is what I did


This shape gave me 2 ends (2 scoops) and I measured up the positions on the cowl and cut the openings. I then trimmed the vac part up and poked it up through the hole.


I need to tidy up around the edge where it pokes through the opening, but otherwise I think it will be ok. I just have the ones on the side to do next.

Cheers and thanks for looking
Anthony

24

Montag, 31. August 2009, 11:53

Hello Anthony

Nice work.

My Respekt for you.


Cheers: Dominik :D :wink:

25

Freitag, 25. September 2009, 01:25

Well, put the car back to work on the BK some more.......much more interesting!

Well, whilst it (once again) dosent took like much, I went back and measured up and cut the hole and inserted the last 2 scoops on the sides. I had to be careful not to make them look pressed out on the skin as they are actually inserted into holes with a sharp transition between the cowl and intake (not a blended one). So once I had them filled with CA around the edges they were then filled with Mr Surfacer and any little areas tidied up. Once it had all gone hard, I then scribed a sharp corner into the join.


There are a couple of panel lined that can now be scribed on.

Next up was the tailboom again!!!! This thing has been driving me nuts. Firstly I had 2 issues that needed dealing with.......possibly. You know the story, no one else will ever spot it. But it was bugging me so much that I just had to go back and re-do it again. There was a very gentle curve in the top tailrotorshaft fairing, so I carved and hacked it all off! Well do or die I thought as I just cant live with it! I replaced the whole fairing and it looks brilliant! I am so pleased I re-did it. I then addressed the issue of the small gearbox fairing at the base of the fin. I skinned the front edge by overlaying a strip over the tailrotor shaft and buffing it back to a scale thickness. The whole fairing was slowly built up with CA and the shape was built up. Finally with some careful scriber work and finishing off with the trusty ol Mr Surfacer to take out any slight imperfections.


Glad that is all done......but issue 2 still needed dealing with. This one was a little more perplexing. When I look at the horizontal stab it looks to be not at 90deg to the boom (only very slightly) but when I put a 90 degree template into the corner it is spot on in all planes. Anyway long story short. Turns out the boom is just veeeeeery slightly off centre (only a couple of deg) but when on the fuse threw the angle off just enough to mess up all the alignment. So out with the razor saw and a cut was made where I thought it was needed. This was just enough (the thickness of a cut) to bring it back into alignment. You should be able to see it in the pics.

Just have a question to those of you who have used the Archer rivet decals. Do I start putting them on at this stage or should I prime the raw plastic first?

Cheers
Anthony

26

Sonntag, 4. Oktober 2009, 12:00

Hi all

Well, I have been quietly beavering away on the BK cowl. This time I have been working on the oval depressions that the latches go onto. I realised that the EC cowl latches are quite different to the BK


First up, I measured the positions and then drilled a hole in the centre of each position. Then a tiny circular file was used to elongate each hole, making sure that it had straight sides not rounded.

Once the 'hole was drilled and shaped, I then thinned the inside out to a correct thickness. Once this was done, I blanked off the inside with plastic card and once again "flooded" the area with Mr Surfacer and buffed back to give a pressed alloy look. I had to be careful as some of them are deeper than others.

Anyway here is the result.


Getting pretty close to priming this piece.......just have to scribe a few panel lines etc first.

Thanks for dropping by

Cheers
Anthony

27

Sonntag, 4. Oktober 2009, 21:02

Oh my goodness,
you´re taking excellent effort on showing every detail on this helo anthiny.
Wow, it is a real joy to watch this kind of modelling.

Dieser Beitrag wurde bereits 1 mal editiert, zuletzt von »kutscha« (4. Oktober 2009, 21:02)


28

Sonntag, 4. Oktober 2009, 21:39

Hi Anthony,

very nice and heavy detailed work.

Looking forward to your next steps and watch you model growing.

Best wishes to NZ and hei konei ra :wink:

Kleiner Maßstab. Große Leidenschaft

29

Sonntag, 4. Oktober 2009, 23:31

Thanks Guys, I really appreciate your feedback

Nice to have so many helicopter builders here!

Cheers
Anthony

30

Mittwoch, 28. Oktober 2009, 09:30

Well, a quick photo update as I had to take some quick snaps for the "Air Rescue" magazine.

I have actually been busy......but still trial fitting/ sanding/ and shimming it all so I wont need much filler on final assy.

I spent a lot of time on the fairing in front of the engine cowl again. There are tricky compound curves on the inside roof that need matching, like this


It took a lot of building up to get it right. I just realised I didnt take a pic of that area I finished. You may be able to see it in this one.


She is really starting to take shape now. I am making a template to hold the brass exhaust pipes etc. I have been also working on the end plates (vertical stabs), but I have a lot yet to do on those.


I think next up has to be the etch.................................I cant put it off any longer, I really dont want to mess it up.

Cheers for looking again
Anthony

Werbung